Getting Creative With Daytime Long Exposures
Jul 27, 2022
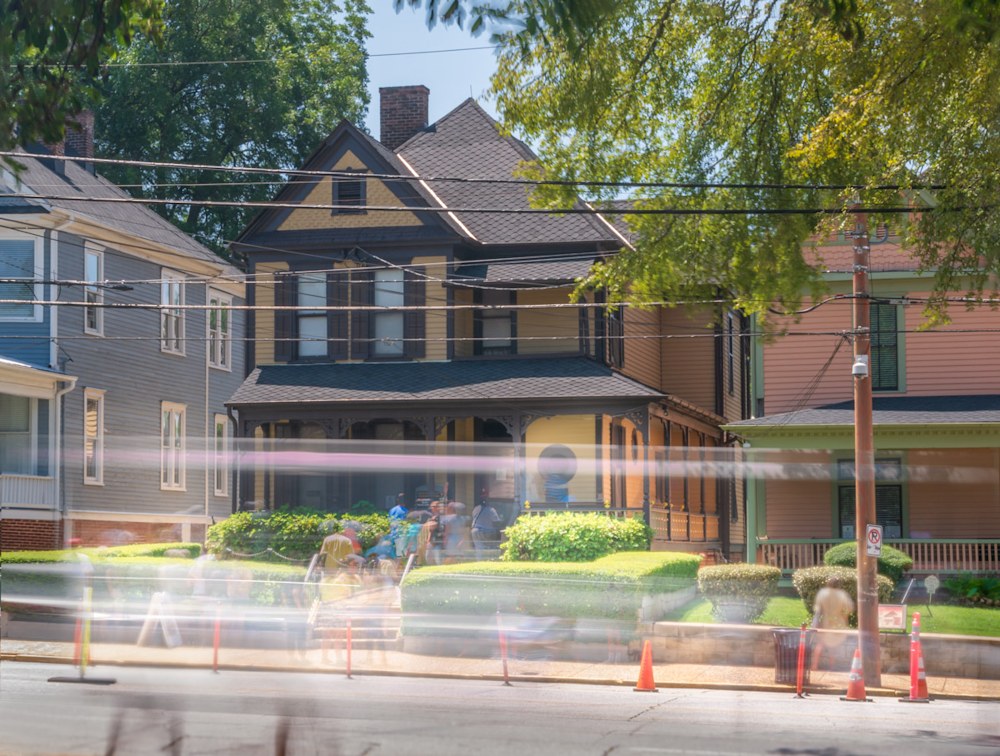 The Martin Luther King, Jr. Birth Home in Atlanta
The MLK Birth Home
In getting photos for my Atlanta coffee table book, I wanted something unique for the MLK birth home. I'd say the home is as iconic as it gets when it comes to Atlanta, and I wanted more than a simple shot of the house.
My first thought was to get a sunrise shot since there are usually so many people around the house that getting just a shot of the house can be hard. I also thought about doing a nice sunset shot but figured there would be lots of people around the house.
My main issue with getting people in the shot is that sometimes people don't want to be in a public photo. I'd hate to have someone open up my coffee table book at some point, recognize themselves, and get angry about it.
When I talked about it with my friend Lauren, she suggested doing a long exposure to show the foot traffic without the faces being identifiable.
I thought that was a great idea. It was Saturday morning around 11 or so, and I grabbed my camera and tripod to head over.
Lauren said she'd go with me. The birth home is less than a block from her house, and it's a few from mine.
Getting the Daytime Long Exposure
One of the fun things about long exposures is how they show movement. You've seen shots of light trails from cars and how they run together.
The same thing happens with people or other objects. If you leave the shutter open long enough, the people become wraith-like. But...it's easier said than done if you're shooting during the day.
It was pretty bright on Saturday morning, and my ND 8-stop filter wasn't quite enough to let me use a long enough shutter to capture the motion. Lauren went back to the house and got her ND filter and put it over the top of mine to make it as dark as we could.
That helped, although the slowest shutter I was able to use was 3.2 seconds. Anything longer was way too bright - blowing out the highlights.
When it comes to getting that nice blurry, ghost-like motion, it helps to have even longer shutter speeds, but I was pretty happy with how this came out.
The Editing Process
The editing is where the magic happens with a shot like this.
I was frustrated with my editing process and not getting what I wanted, so I asked Lauren for some words of wisdom.
She did better than that. She sat with me and showed me her technique for stacking layers and getting the desired end result.
I've said it before and I'll say it again, Photoshop is a super robust program, and there are multiple ways of doing the same thing. That's great but it also makes it hard and often confusing.
My process sometimes includes masking out portions of a photo to hide what's underneath in another photo, or I'll use a paintbrush to "reveal" what's underneath - this is when I'm stacking more than one photo in layers.
I was doing the opposite of how Lauren does it when she's editing multiple layers, and I'm glad she showed me her way. I was using the black paintbrush to reveal from a white mask.
Lauren inverts her mask to hide everything and then only paints where she wants details from the other layers to show through - it's much more efficient and made more sense to me.
As I'm typing this, I realize it's hard to understand - sorry for that. It is hard to understand, even when you're doing it!
All I can say about Photoshop is practice, practice, practice. That's what I'll keep doing because I love the possibilities.
Have a great Wednesday!
xoxo,
Susan